
Table of Contents
- Let’s get naked
- What is a Milk Bar cake anyway?
- Hang on, the cake’s not round?
- So. Many. Layers
- What about the kirsch?
- Special Equipment Alert!
- Modern Black Forest Cake Recipe
I need to stop saying this (because it’s even starting to annoy me now) but this black forest naked cake might just be the best recipe on my blog. Ever. Full stop. It ticks all the boxes:
- Incredibly delicious chocolate and cherry cake? TICK.
- Recipe that involves minimal skill or baking experience? TICK
- Beautiful cake that’s not intimidating to make at all? TICK
- My favourite cake flavour of all time? TICK.
I mean, just look at my little cake baby:

Isn’t it the cutest? And not at all difficult to get looking this gorgeous with the help of a cake ring and some acetate. Anyone can make this layer cake! It’s not just for skilled cake decorators. Although the recipe is lengthy, and there are a few different pieces you need to make before you start assembling (chocolate cake, cherry filling, whipped cream, chocolate ganache), once you’ve got them all together it’s as simple as layering once on top of the other. You don’t even need to be neat.
If you’re going to make one layer cake anytime soon, I really think this should be it.
Let’s get naked
Never made a naked cake before? Me neither. I’ve always been a keen frosting-all-over sort of girl, which is a little weird seeing as neither myself or my wife are super into icing. But I was inspired by this S’mores Layer Cake from Brown Eyed Baker (which is one of the most heart-eyes-emoji cakes you’ve ever seen, right?) to give this naked “Milk Bar” style cake a try.
Plus, I’ve just ordered the Milk Bar cookbook from Amazon, so I’m sure there will be many more Momofuku-inspired recipes heading your way very soon.
Apart from the lack of frosting, naked cakes are great for people who don’t have time time or attention-to-detail to spend hours intricately frosting a layer cake with completely smooth buttercream and piped decorations. They look stylish and beautiful, but the only effort I put into decorating this cake was adding a mound of fresh cherries to the top. Honest!

What is a Milk Bar cake anyway?
The Momofuku Milk Bar is a US bakery that is most famously located in New York City. Even though I’ve spent way too many (but still not quite enough) holidays in NYC, I’ve never actually been to Milk Bar. But you don’t have to have walked through the doors to know that they are synonymous with two things: cereal milk and naked layer cakes. And as we’ve been down the cereal milk route before, it seemed only fair to give the layer cake a go.

As mentioned above, there are a few simple parts to this black forest naked cake, which all come together to make something pretty special. Let’s start with the chocolate cake shall we?
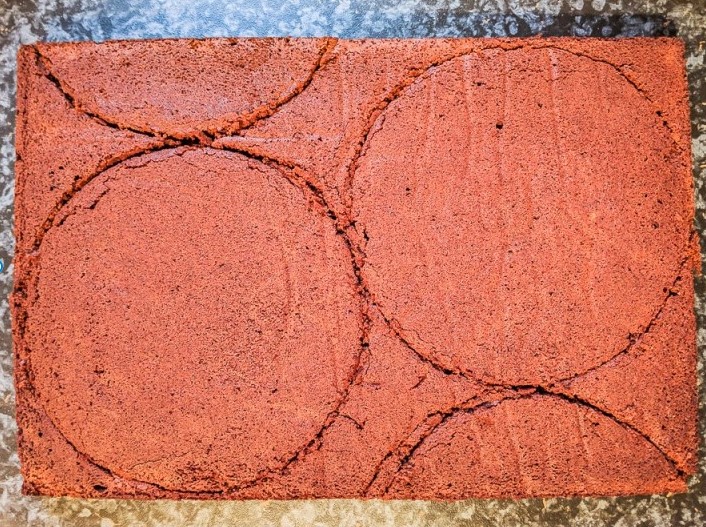
Hang on, the cake’s not round?
The most important thing to note when it comes to the chocolate cake is that you’re not going to bake three 6 inch chocolate cakes. Instead, we’re going to do things the Milk Bar way, and bake one large sheet cake which is going to get cut up into two 6 inch circles. The remaining off-cuts from the sheet cake are going to be put together like a jigsaw to make the bottom layer of the cake.
Does this sound a bit mad? Yes. But does it absolutely work? HELL YES.
Here’s a little guide to the way I found easiest to cut up the cake – using my 6 inch cake ring as a template:
When it comes to the actual cake recipe, there’s nothing difficult or time consuming here. The Milk Bar recipe book would tell you to make your own chocolate fudge sauce to add to the batter, but I’m just going to tell you to buy it store bought. In my opinion, homemade chocolate fudge sauce adds nothing earth-shattering to the table, so why add the extra step? I’m all about minimising effort wherever possible, as long as it doesn’t compromise on taste, of course.

So. Many. Layers
There are three (!) different layers of filling between each of the three cakes. First up, you’ve got some good old dark chocolate ganache. This helps to add chocolatey flavour, but also keeps the homemade cherry filling from making the cake layer beneath it too soggy.
And then there’s the whipped cream, which cuts through the sweetness and lightens things up a little bit. And you can’t really have a black forest cake without whipped cream, can you. That’s not a question – you can’t.
There’s no waiting around between layers either – spread the ganache out, then add the cherries, and go straight in with the whipped cream. They’re going to get mushed together a little, but that’s okay. It will still look beautiful!
What about the kirsch?
Ah yes, you’ve got to have kirsch in a black forest naked cake. Or do you?
If you’ve got some to hand (like I had) then add it to some cherry juice and drizzle it over each of the chocolate cake layers before you add the ganache. If you don’t have any, don’t want to buy any, or don’t want to use alcohol at all, then just use cherry juice. You can find it at the supermarket with all the other juices, and it definitely helps keep things from being even slightly too dry.

Special Equipment Alert!
I like to be honest with you guys wherever possible, and this black forest naked cake is going to need a few special bits of equipment which you might not already own. I had to go out and buy a 6-inch cake ring, which you’ll absolutely need to construct this layer cake in. You could use a 6-inch spring form tin as well – the key is to have straight deep edges and a removable base and sides. This is the one I used – and it’s extra helpful as you can change the size up from 6 inches to 12 inches (US version here).
Six inches sounds like a teeny tiny cake, but once you’ve layered all the fillings and cake on top of each other, this will easily serve 10 or 12 people. And the whipped cream isn’t going to keep for more than a couple of days, so you’re not going to want tonnes of leftovers lying around. Who am I kidding? This cake doesn’t do leftovers.
You’re also going to need some baking acetate to add height to your 6-inch cake ring, as this cake will be at least 6 or 7 inches tall once you’ve finished layering up. This is the roll I purchased, and it worked like a charm (US version here).
And that’s about it. Pop your black forest naked cake on a cute cake stand (mine is from H&M) and you’ve got yourself the naked cake of your dreams. Would make a fantastic birthday cake, or even as part of a wedding dessert table, don’t you think?
Modern Black Forest Cake Recipe
My absolute favourite layer cake, this Milk Bar style Black Forest Naked Cake is packed full of cherries, whipped cream, and dark chocolate ganache. It’s much easier to make than it looks and tastes incredible!
| REP TIME: | 1 hr |
| COOK TIME: | 30 mins |
| FREEZING / CHILLING TIME: | 15 hrs |
| TOTAL TIME: | 1 hr 30 mins |
| COURSE: | Cakes, Dessert |
| SERVINGS: | 10 people |
| PROCESS | INGREDIENTS | INSTRUCTIONS |
| For the chocolate sheet cake | 115 g unsalted butter room temperature 300 g caster sugar (US granulated sugar) 3 large eggs 120 ml buttermilk 60 ml sunflower or canola oil 3 tablespoons chocolate fudge sauce 1 teaspoon vanilla extract 1 teaspoon instant coffee granules 130 g plain or all-purpose flour 15 g cornflour or cornstarch 70 g cocoa powder 1½ teaspoons baking powder 1 teaspoon salt | Preheat the oven to 180°C / 350°F (160°C fan) and grease and line a 20cm x 30cm (12in x 8in) cake tin with baking parchment or greaseproof paper. Cream the butter and sugar together in your stand mixer, or in a large bowl if using a hand mixer, until well combined. Add the eggs (all at once is fine) and beat on high until completely mixed together. Place the buttermilk, sunflower oil, chocolate fudge sauce, vanilla extract, and instant coffee granules into a smaller jug or bowl and mix together until the coffee has dissolved. Pour this into the bowl with the butter/sugar mix, and beat well on high for a few minutes, scraping down the bowl as and when necessary. Sift the flour, cornflour, cocoa powder, baking powder and salt into the bowl with the batter. Mix together gently until only just combined, and then spoon the batter into the pre-lined cake tin. Smooth out flat, making sure the batter makes it all the way to the corners. Bake for 30-35 minutes, or until a skewer inserted into the middle comes out with a couple of crumbs on it. Once baked, leave to cool in the tin on a wire rack for 15 minutes or so, and then remove from the tin and place on the rack to cool completely. |
| For the cherry filling | 450 g fresh or frozen cherries pitted 50 g caster sugar (US granulated sugar) 2 tablespoons cornflour or cornstarch | Place the cherries, caster sugar, and cornflour into a saucepan on a medium heat. Stir occasionally, and once the mixture comes to the boil, reduce the heat slightly and leave to simmer for 10-15 minutes or so, stirring occasionally. Once thickened, remove from the heat and leave to cool completely before using in this recipe. |
| For the dark chocolate ganache | 80 g dark or semi-sweet chocolate chips 60 ml double or heavy cream | Place the chocolate chips into a small bowl, and cover with the double cream. Heat in the microwave for 30 seconds, give the mixture a bit of a shake (don’t stir) and then place back in the microwave for 15-20 seconds, or until the cream starts to very slightly bubble. Remove from the microwave and leave to stand for a minute to help the chocolate melt. Stir the cream and chocolate together until a smooth ganache forms. If the ganache splits or looks super oily, then add a couple of tablespoons more cream to the bowl and pop back in the microwave for 15 seconds. Stir again immediately. Once the ganache is smooth and silky, set aside to cool to room temperature before using in the cake. |
| For the cherry drizzle | 2 tablespoons kirsch (cherry liqueur) optional – see method 4 tablespoons cherry juice | Place the kirsch and cherry juice into a small bowl and stir together. If you don’t want to use kirsch at all (or just don’t want to buy any) then you can just use 6 tablespoons of cherry juice instead. |
| For the whipped cream filling | 480 ml double or heavy cream 5 tablespoons icing sugar or confectioner’s sugar | Place the double cream and icing sugar into a large bowl and whisk to stiff peaks with an electric hand whisk (or in a stand mixer with the balloon attachment). Be careful not to over whisk – you want the peaks to be stiff, but you don’t want the cream to look crumbly. |
| To assemble the cake | 12 fresh cherries for decoration optional Six-inch cake ring 20 inches baking acetate | Ensure you have made all of the parts needed for the cake, and that the cherry filling and ganache have cooled to room temperature, before you begin assembling the cake. Firstly you are going to cut the sheet cake into three pieces. To do this, you will need to cut out two 6 inch circles using your cake ring as a guide. The rest of the cake scraps will be used to make the bottom layer, so don’t eat or throw away yet. Please see photo above for a guide on the best way to cut the sheet cake. Place the cake ring on to a board, baking sheet, or plate. Line with inside of the cake ring with acetate, taping the ends of the acetate together where they meet. Using the cake scraps, assemble the bottom layer of the cake inside the cake ring, making sure that the cake is tightly packed and there are no gaps in the layer. Once happy, spoon two tablespoons of the cherry drizzle over this cake layer, trying to make sure the whole cake layer is moist. Spoon approximately one third of the chocolate ganache onto the cake layer, and spread evenly. Make sure the ganache gets right to the edges of the cake. Spoon half of the cherry filling on top of the ganache and spread out evenly, again making sure to get right up to the edges. Finally, gently spoon half of the whipped cream on top of the cherry layer, spreading out gently to the edges of the cake, trying to avoid mixing with the cherry layer underneath. Try and get the cream layer as flat as possible. Take a second strip of acetate and gently tuck this between the cake ring and the top 1/4 inch of the first strip of acetate, so that you have a clear ring of acetate about 5 inches tall. Tape the ends of the circle together where they meet. Place one of the cake circles on top of the cream layer, pressing down gently but firmly with your hands. Repeat the process as before, by drizzling two tablespoons of cherry drizzle over the cake, and then adding one third of the ganache, the remaining cherry filling, and the remaining whipped cream. Again, make sure to get each layer of filling right up to the edges of the acetate, and try to make the whipped cream layer as flat as possible. Place the remaining cake circle on top of the final cream layer, and press down as before. Drizzle the cake circle with the one or two tablespoons of cherry drizzle – don’t use it all if you don’t think it’s needed. Spoon the last third of the ganache on top of the cake and spread out as before – you’ve done this enough times to know what you’re doing by now! Place the cake (still on the board/plate/sheet) in to the freezer for 12 hours. This will help join all the various cake and filling layers together. You can leave the assembled cake in the freezer for up to two weeks if needed. Once ready to serve, remove from the cake from the freezer, and gently remove the cake ring and acetate from it. Place on to a serving board or stand, and pop in the fridge for four hours to defrost thoroughly. Serve straight from the fridge, topping with a pile of fresh cherries if wanted. |
This cake needs to be stored in the fridge when not serving, and should keep for 2-3 days. It is at its best when eaten on the day of defrosting.