
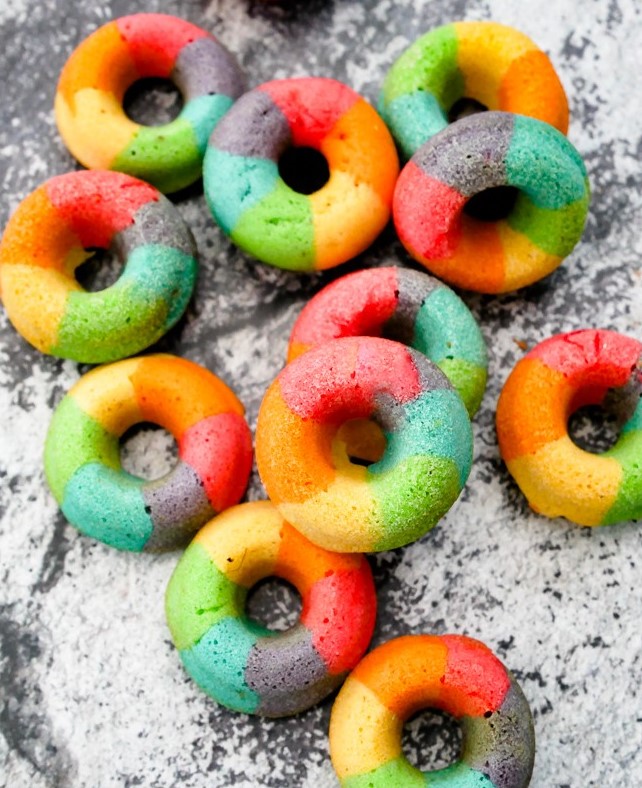
You might think that these cute mini rainbow doughnuts are all looks and no substance, but you’d be oh so very wrong. Yeah, they might not have any glaze or frosting, but there’s something incredibly moreish about these guys that means you can’t stop after just one.
One dozen? Maybe.
Not only are they yummy as hell, they also involve pretty minimal baking skills and absolutely no intricate decoration. Just pipe (or spoon) some coloured batter into a doughnut pan, bake for 10 minutes, and you’ve got yourself the most beautiful little doughnuts in all the world.
Table of Contents

Baked, Not Fried
You might not remember, but we have actually made doughnuts before. Although unlike these rainbow cuties, they needed two things that make for a more difficult baking challenge – yeast and hot oil. Whilst there is no substitute for a proper fried doughnut, sometimes you just want something a little easier to throw together, with a lot less waiting around and absolutely no chance of burning yourself on boiling oil.
Plus, there’s no way you’re going to get such a perfect rainbow pattern in a deep fat fryer. And I’ve got to stay on brand, right?
Baked doughnuts are a whole different ballgame to their fried counterparts, and as long as you’re prepared for that then you won’t be disappointed. Don’t go expecting that light fluffy texture you’re only going to get from a yeasty dough when you’re essentially making a cupcake in ring form. Baked doughnuts are a denser and less crispy treat, yet they still manage to have freshly baked doughnut taste to them.
And that’s all thanks to a little pinch of grated nutmeg in the batter.
Why so small?
I originally wanted to make full-size rainbow doughnuts, but as luck would have it I couldn’t find my big doughnut pan in the mess that is our under-the-stairs cupboard and I had to use the mini pan instead. I’m sure you’ll agree that the resulting mini rainbow doughnuts are so much more adorbs than their bigger cousins would have been.
If you want to make them full-size then you can definitely do so – just add a few more minutes to the baking time. You’re only going to get six or eight large doughnuts out of the recipe below, but it can easily be doubled if you’re looking to make enough to last you more than a few hours.
I think cute and mini is the way to go though – I’m such a sucker for small versions of things. And I weirdly think these mini rainbow doughnuts would look incredible as toppers on some vanilla cupcakes! Am I crazy?

The only real concerns I had going into this rainbow doughnut experiment were whether the colours would run together, or whether they wouldn’t come out anywhere near bright enough. I don’t know about you, but I’ve had so many instances in my baking life where I’ve put something bright and colourful in the oven, and 20 minutes later I’ve removed an underwhelmingly brown cake from the oven. Sound familiar?
Well, the short baking time and light batter in these mini doughnuts are the perfect recipe for the brightest baked goods imaginable! You can use any gel or paste food colouring you have to hand – although I bought this set of Wilton food colours a while back, and they’ve been working wonders ever since.

I genuinely couldn’t stop eating these little doughnuts, and as soon as I’d finished photographing them they were long gone. Katie will testify to this – she only managed to get her hands on one or two before I’d demolished them all. I’m definitely planning on making another batch as soon as possible – maybe mermaid or galaxy coloured this time?
And if you make a batch, whatever colour they are, then please let me know how you get on in the comments below!
Mini Rainbow Doughnuts (Baked) Recipe
The happiest little doughnuts in the world! No pesky decorating needed, because the beauty is all in the batter.
| PREP TIME : | 25 mins |
| COOK TIME | 10 mins |
| TOTAL TIME | 35 mins |
| COURSE | Dessert, Snack |
| CUISINE | American |
| SERVINGS | 18 doughnuts |
| INGREDIENTS | INSTRUCTIONS |
| 75 g unsalted butter at room temperature 50 g caster sugar (US granulated sugar) 1 large egg ½ teaspoon vanilla extract 125 g plain or all-purpose flour ½ teaspoon baking powder ⅛ teaspoon bicarbonate of soda (US baking soda) Generous inch of salt Pinch of grated nutmeg 60 ml buttermilk Gel or paste food colouring (red, orange, yellow, green, blue, and purple) | Preheat the oven to 180°C / 360°F (160°C fan), and lightly grease a mini doughnut pan. Place the butter and sugar into a medium bowl and beat well with a hand-held electric mixer until light and fluffy. You can use a stand mixer if you like, although due to the smaller amount of batter involved in these little doughnuts, it can be easier to use a hand-held mixer. Add the egg and vanilla extract to the bowl and beat well. The batter will curdle, but that’s okay. Sift the flour, baking powder, bicarbonate of soda and salt into the bowl with the batter, and then add the freshly grated nutmeg. Mix together until fully incorporated. Add the buttermilk to the batter and continue to mix until the batter is smooth. Be careful not to over-mix, as you don’t want the doughnuts to be tough. Spoon the batter into six smaller bowls, trying to be as equal as possible – there’s no need to weigh the batter, I like to just eyeball it. Add a different food colouring to each bowl, mixing well to ensure that each colour is even. Either pipe or spoon the batters into the doughnut tin in a rainbow pattern, ensuring that each hole is about half full. Knock the doughnut pan on the table a few times to help get rid of any air bubbles, and then place in the preheated oven for about 10 minutes until a skewer or toothpick inserted into one of doughnuts comes out clean. Turn out of the pan fairly quickly, and then leave the doughnuts to cool on a wire rack. |
The doughnuts should stay fresh for 3-4 days if kept in an airtight container. They can also be frozen for up to 3 months – defrost at room temperature.
Recipe inspired by Cupcake Jemma.